Showing posts with label Blogger Tips. Show all posts

How to Enter iPhone, iPad CheckerBoard Diagnostics Mode in iOS 10.3


Here’s a complete guide on how to enter CheckerBoard Diagnostics Mode in iOS 10.3 running on iPhone or iPad.

iOS 10.3 Has a Hidden CheckerBoard Diagnostics Mode Setting – Accessing is Pretty Straightforward too

With the release of iOS 10.3 Beta, Apple has baked in a new CheckerBoard diagnostics mode, allowing Apple to quickly go through certain parameters of your iPhone or iPad. Using this feature, the company can find out if there is something wrong with the software or hardware, or maybe both. Interestingly, anyone can access this feature, thanks to developer Steve Troughton-Smith. But remember, while this feature is accessible right now by anyone, there’s a chance Apple might lock it down as soon as the final version of the software is released to the public later on. Also, since this feature is meant for Apple and its employees to run diagnostics on your iPhone or iPad, therefore please do not tinker around with it too much. There’s no telling what sort of damage you might end up doing to your device. Therefore it’s best to play safe at every step of the way.
Are we clear? Let’s dive into the neat stuff now!
1. Power down your iPhone or iPad.
2. Connect your device to a charger and then immediately hold down the Volume up + Home key combination together.

Use Analytics with Blogger

Use Analytics to find out where readers are coming from and what they’re looking at on your blog.

Step 1: Sign up for Analytics

  1. Sign up for an Analytics account.
  2. Find your Analytics tracking ID.

Step 2: Add Analytics tracking

  1. Sign in to Blogger.
  2. Click the blog you want to analyze.
  3. In the left menu, click Settings and then Other.
  4. Under “Google Analytics,” type the Analytics tracking ID. It should use this format: UA-XXXXX-XX.
  5. In the top right corner, click Save settings.
It can take up to 24 hours for data to show up in Analytics.

Use a custom domain

There are two ways you can publish your blog on Blogger - either by hosting it on Blogspot (example.blogspot.com) or hosting on your own custom domain (www.example.com or foo.example.com). You can change where your blog is published at any time, and it won't cause you to lose any content on your site.

Step 1: Purchase a custom domain

Before you move your blog to a custom domain, you need to have already purchased a custom domain from another provider.
There are many companies you can buy domain names from, including:
Tip: If you're in the United States, you can also integrate Google Domains with Blogger.
If your site's content is in a different language and you'd like to purchase a country-specific domain, you can do a search to find local registrars. For example, if your blog is in French and you'd like a www.example.fr domain, try searching for [domain registrar in france].

Step 2: Set up your domain with your blog

Use a top-level domain

After you've purchased your custom domain, follow the steps below:
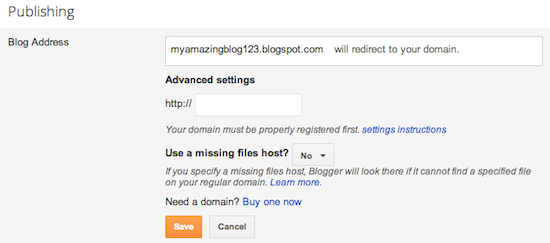
  1. Go to your blog and click on Basics under the Settings tab. In the "Publishing" section, click the link to add a custom domain.
      Add a custom domain
     
  2. Type the url of the domain you've purchased, keeping in mind that it must begin with www in order to work.
  3. Click Save.
  4. You should see an error, and two CNAMEs listed below. Each CNAME is composed of two parts - Name, Label or Host and Destination, Target or Points to. The first CNAME is the same for everyone, Name being "www" and Destination "ghs.google.com." The second CNAME is particular to your blog and your Google Account, and is therefore different for each person.
  5. Go to your domain registrar's website and locate the DNS (Domain Name System) settings in the control panel.
  6. Now it's time to enter the CNAMEs. Where it says Name, Label or Host simply enter "www" and list ghs.google.com as the Destination, Target or Points to.
  7. Now enter the second CNAME in the same way.
  8. Optional: You can also enter A-records, which links your naked domain (example.com) to an actual site (www.example.com). If you skip this step, visitors who leave off the "www" will see an error page.
  9. Optional continued: After completing Step 8, enter your domain name in the format example.com, and list the I.P. addresses shown below in the "A" section. You'll need to create four separate A-records which point to four different Google IPs.
    216.239.32.21
    216.239.34.21
    216.239.36.21
    216.239.38.21
    End of optional section
  10. Before you move onto the final step, wait about an hour for your DNS settings to activate. If you attempt the final step before your settings are activated, we'll let you know with a warning message.
  11. After your settings have been activated, you need to make sure Blogger knows about your custom domain so that Google can direct readers to your blog. Just head back to Blogger and update the information on your Settings | Basic tab. Find the area for "Publishing," and click the link to add a custom domain.
      Add a custom domain
    Enter in the URL for your custom domain in the text box provided, and click Save.
    Enter URL and save  
    That’s it! Your blogspot.com address will soon redirect to your new custom domain -- be patient, as it might take up to 24 hours for the redirect to start working. If you're still seeing an error after 24 hours, it means your settings weren't entered correctly and you should try the process a second time.
Some helpful notes:
  • If your new domain isn't taking you to your blog, wait another day or two to make sure all the DNS servers have been updated. If it still isn't working, contact your registrar to make sure you entered the DNS settings correctly.
  • Your original Blogspot address will automatically forward to your new domain. That way, any existing links or bookmarks to your site will still work.
  • Your posted images will continue to display on your blog.

Use a subdomain

After you've purchased your custom domain, follow the steps below:
  1. Go to your blog and click on Basics under the Settings tab. In the "Publishing" section, click the link to add a custom domain.
      Add a custom domain
     
  2. Type a subdomain like blog. then the url of the domain you've purchased.
  3. Click Save.
  4. You should see an error, and two CNAMEs listed below. Each CNAME is composed of two parts - Name, Label or Host and Destination, Target or Points to. The first CNAME is the same for everyone, Name being "www" and Destination "ghs.google.com." The second CNAME is particular to your blog and your Google Account, and is therefore different for each person.
  5. Go to your domain registrar's website and locate the DNS (Domain Name System) settings in the control panel.
  6. Now it's time to enter the CNAMEs. Where it says Name, Label or Host, simply enter the subdomain name (for example, blog.) and list ghs.google.com as the Destination, Target or Points to.
  7. Now enter the second CNAME in the same way.
  8. Before you move onto the final step, wait about an hour for your DNS settings to activate. If you attempt the final step before your settings are activated, we'll let you know with a warning message.
  9. After your settings have been activated, you need to make sure Blogger knows about your custom domain so that Google can direct readers to your blog. Just head back to Blogger and update the information on your Settings | Basic tab. Find the area for "Publishing," and click the link to add a custom domain.
      Add a custom domain
    Enter in the URL for your custom domain in the text box provided, and click Save.
    Enter URL and save  
    That’s it! Your blogspot.com address will soon redirect to your new custom domain -- be patient, as it might take up to 24 hours for the redirect to start working. If you're still seeing an error after 24 hours, it means your settings weren't entered correctly and you should try the process a second time.
Some helpful notes:
  • If your new domain isn't taking you to your blog, wait another day or two to make sure all the DNS servers have been updated. If it still isn't working, contact your registrar to make sure you entered the DNS settings correctly.
  • Your original Blogspot address will automatically forward to your new domain. That way, any existing links or bookmarks to your site will still work.
  • Your posted images will continue to display on your blog.

Troubleshoot issues

If at any point the setup process doesn't allow you to progress any further, there may be an issue with your domain's DNS configuration. Please inspect your DNS settings via your domain host, correct any potential configuration errors, and try again.

Connect Google+ with Blogger

You can use Google+ to let people know about your blog and engage with your readers.
You need to change to your Google+ profile to automatically post to your profile or to any Google+ page managed by your profile. Learn to create a Google+ page.

Choose which Google+ profile or page you share to

  1. Sign in to Blogger.
  2. Select the blog to update.
  3. In the left menu, click Settings > Posts, comments and sharing.
  4. Under "Share to Google+," click the Down arrow next to "choose your Google+ page or profile."
  5. In the top right, click Save settings.

Share your posts to Google+

Share a blog post
If you don't often share blog posts to Google+, you can share individual posts:
  1. Sign in to Blogger.
  2. Select the blog to update.
  3. In the left menu, click Posts.
  4. Under the post you want to share with Google+, click Share.
Automatically share to Google+
If you want to share all of your blog posts on Google+, turn automatic sharing on:
  1. Sign in to Blogger.
  2. Select the blog to update.
  3. In the left menu, click Settings > Posts, comments and sharing.
  4. Under "Share to Google+" next to "Auto-share new published posts to your Google+ Profile," choose Yes.
  5. At the top right, click Save settings.

Automatic sharing doesn't work for:

  • Blogs with adult content
  • Posts created using an API
  • Posts you imported
Choose the posts to share
If you want to share some posts but not all of them:
  1. Sign in to Blogger.
  2. Select the blog to update.
  3. In the left menu, click Settings > Posts, comments and sharing.
  4. Under "Share to Google+" next to "Prompt to share after posting," choose Yes.
  5. At the top right, click Save settings.
A box will show when you publish a post. You can add a message and choose who to share with.

Google+ followers

You can add the Google+ followers gadget to your blog:
  1. Check if your page or profile publicly shows your followers.
  2. Sign in to Blogger.
  3. Select the blog to update.
  4. In the left menu, click Layout > Add a gadget.
  5. In the gadget list, find "Google+ followers" and click Add .
  6. On the top right, click Save arrangement.
If the gadget shows up empty:
  • Make sure your user profile is set to Google+.
  • Make sure your blog is linked to a profile or page.

+1 counter

You can see which posts are popular with the +1 counter.
When readers click the +1 button on a blog post, a box pops up so they can share the post with their circles on Google+, if they have already signed up for Google+.
Turn on the +1 counter
See who +1'd your posts

Google+ comments

You can turn on Google+ comments to allow users to comment on your Blogger blog posts with Google+. To comment on your blog, readers need a Google+ profile or page.
You can tell you have Google+ comments if:
  • You see an option to share comments to Google+.
  • As the author of a post, you receive Google+ notifications when readers comment on or share your blog post.
  • If you used Blogger comments, they will remain on your blog. Other commenting systems might not be kept when you turn on Google+ comments.
Learn more about who can see your Google+ comments.

To turn on Google+ comments:

  1. Make sure you're using Google+ as your profile and your blog is public.
  2. Sign in to Blogger.
  3. Select the blog to update.
  4. In the left menu, click Settings > Posts, comments and sharing.
  5. Under "Google+ Comments," choose Yes. At the top right, click Save settings.

Turn off Google+ Comments

Follow the steps above but for Step 5 choose No. You can only turn off Google+ comments if you have a Google+ profile:
  • If you change your blog URL, your Google+ comments will disappear from your blog, but they may continue to appear on Google+.
  • If you stop using Google+ comments, your Google+ comments will disappear from your blog, but they may continue to appear on Google+.
Troubleshoot Google+ comments
Moderate Google+ comments

Mentions in Blogger

You can mention a person or Google+ page to let them know that you're referring to them in your blog post.
To mention someone:
  1. Switch to a Google+ profile.
  2. In the post editor, type "+" or "@," followed by a name or page.
  3. When a list of names appears, select the person or page you'd like to mention.

    Advertise on your blog

    1. Sign in to Blogger.
    2. Click the blog you want to run ads on.
    3. In the left menu, click Earnings.
    4. Click Sign up for AdSense. If you don’t see the button, it means your blog might not qualify for AdSense. Check the AdSense eligibility checklist to find out why.
    5. Fill out the form with your Google Account or create a new one.
    Note: It can take at least 48 hours for your application to be reviewed.

    Show ads between your posts

    1. Sign in to Blogger.
    2. Click the blog you want to show ads on.
    3. In the left menu, click Layout.
    4. In "Blog Posts" under "Page Body," click Edit .
    5. In the window that appears, check the box next to "Show Ads Between Posts."
    6. Choose the ad format, colors, and how often the ads should appear.
    7. Click Save. 

    Show ads in the columns

    1. Sign in to Blogger.
    2. In the left menu, click Layout.
    3. Click Add a Gadget.
    4. Select the AdSense gadget and click Add Add.
    5. Configure AdSense and click Save.
    6. In the top right, click Save arrangement.

    Show mobile-friendly ads

    You can use AdSense page-level ads to:
    • Place an ad on the edge of readers' mobile or tablet screens
    • Add a full-screen ad on every page
    To set up your ads:
    1. Sign in to AdSense.
    2. Choose which types of page-level ads you want to use.
    3. To see how the ads will look, use a phone or tablet and add #googleads at the end of your blog’s URL.

    Show ads from other ad services

    1. Sign in to Blogger.
    2. Click the blog you want to show ads on.
    3. In the left menu, click Layout.
    4. In the area where you want to place the ads, click Add a gadget.
    5. In the window that appears, under "Basics," find HTML/Javascript and click Add Add.
    6. Enter a title (optional).
    7. Copy and paste the code from the ad service website into the content section.
    8. Click Save. 

    See your Blogger earnings report

    1. Sign in to Blogger.
    2. Click the blog you want to see a report for.
    3. Click Earnings.
    4. Click Visit AdSense for details of my earnings.
    See the AdSense glossary to learn what each term on your report means.

    What to do if AdSense isn’t turning on

    1. Sign in to Blogger.
    2. On the Blogger dashboard, click the blog you want to put AdSense ads on.
    3. In the left menu, select Layout.
    4. Under the AdSense gadget, click Edit.
    5. Click Save.
    6. Repeat Steps 4 and 5 for every AdSense gadget on your blog.
    7. At the bottom of your "Blog Posts" gadget, click Edit.
    8. Click Save.
    9. In the top right, click Save arrangement.

    Show mobile-friendly ads

    You can use AdSense page-level ads to:
    • Place an ad on the edge of readers' mobile or tablet screens
    • Add a full-screen ad on every page
    To set up your ads:
    1. Sign in to AdSense.
    2. Choose which types of page-level ads you want to use.
    3. To see how the ads will look, use a phone or tablet and add #googleads at the end of your blog’s URL.

    Show ads from other ad services

    1. Sign in to Blogger.
    2. Click the blog you want to show ads on.
    3. In the left menu, click Layout.
    4. In the area where you want to place the ads, click Add a gadget.
    5. In the window that appears, under "Basics," find HTML/Javascript and click Add Add.
    6. Enter a title (optional).
    7. Copy and paste the code from the ad service website into the content section.
    8. Click Save. 

    See your Blogger earnings report

    1. Sign in to Blogger.
    2. Click the blog you want to see a report for.
    3. Click Earnings.
    4. Click Visit AdSense for details of my earnings.
    See the AdSense glossary to learn what each term on your report means.

    What to do if AdSense isn’t turning on

    1. Sign in to Blogger.
    2. On the Blogger dashboard, click the blog you want to put AdSense ads on.
    3. In the left menu, select Layout.
    4. Under the AdSense gadget, click Edit.
    5. Click Save.
    6. Repeat Steps 4 and 5 for every AdSense gadget on your blog.
    7. At the bottom of your "Blog Posts" gadget, click Edit.
    8. Click Save.
    9. In the top right, click Save arrangement.

    Show mobile-friendly ads

    You can use AdSense page-level ads to:
    • Place an ad on the edge of readers' mobile or tablet screens
    • Add a full-screen ad on every page
    To set up your ads:
    1. Sign in to AdSense.
    2. Choose which types of page-level ads you want to use.
    3. To see how the ads will look, use a phone or tablet and add #googleads at the end of your blog’s URL.

    Show ads from other ad services

    1. Sign in to Blogger.
    2. Click the blog you want to show ads on.
    3. In the left menu, click Layout.
    4. In the area where you want to place the ads, click Add a gadget.
    5. In the window that appears, under "Basics," find HTML/Javascript and click Add Add.
    6. Enter a title (optional).
    7. Copy and paste the code from the ad service website into the content section.
    8. Click Save. 

    See your Blogger earnings report

    1. Sign in to Blogger.
    2. Click the blog you want to see a report for.
    3. Click Earnings.
    4. Click Visit AdSense for details of my earnings.
    See the AdSense glossary to learn what each term on your report means.

    What to do if AdSense isn’t turning on

    1. Sign in to Blogger.
    2. On the Blogger dashboard, click the blog you want to put AdSense ads on.
    3. In the left menu, select Layout.
    4. Under the AdSense gadget, click Edit.
    5. Click Save.
    6. Repeat Steps 4 and 5 for every AdSense gadget on your blog.
    7. At the bottom of your "Blog Posts" gadget, click Edit.
    8. Click Save.
    9. In the top right, click Save arrangement.

    Show mobile-friendly ads

    You can use AdSense page-level ads to:
    • Place an ad on the edge of readers' mobile or tablet screens
    • Add a full-screen ad on every page
    To set up your ads:
    1. Sign in to AdSense.
    2. Choose which types of page-level ads you want to use.
    3. To see how the ads will look, use a phone or tablet and add #googleads at the end of your blog’s URL.

    Show ads from other ad services

    1. Sign in to Blogger.
    2. Click the blog you want to show ads on.
    3. In the left menu, click Layout.
    4. In the area where you want to place the ads, click Add a gadget.
    5. In the window that appears, under "Basics," find HTML/Javascript and click Add Add.
    6. Enter a title (optional).
    7. Copy and paste the code from the ad service website into the content section.
    8. Click Save. 

    See your Blogger earnings report

    1. Sign in to Blogger.
    2. Click the blog you want to see a report for.
    3. Click Earnings.
    4. Click Visit AdSense for details of my earnings.
    See the AdSense glossary to learn what each term on your report means.

    What to do if AdSense isn’t turning on

    1. Sign in to Blogger.
    2. On the Blogger dashboard, click the blog you want to put AdSense ads on.
    3. In the left menu, select Layout.
    4. Under the AdSense gadget, click Edit.
    5. Click Save.
    6. Repeat Steps 4 and 5 for every AdSense gadget on your blog.
    7. At the bottom of your "Blog Posts" gadget, click Edit.
    8. Click Save.
    9. In the top right, click Save arrangement.

    Page elements tags for layouts

    The <body> section of a layout theme is made up of sections and widgets.
    • Sections are areas of your page, such as a sidebar, footer.
    • A widget is a page element such as a page, a blogroll, or anything else you can add from the “Page Elements” tab.
    You can include any HTML you like around the sections in your theme.

    Sections

    Each section in your theme has opening and  closing tags that look something like this:
    <b:section id='header' class='header' maxwidgets="1" showaddelement="no">
    </b:section>
    <b:section> tag attributes
    • id – (Required) A unique name, with letters and numbers only.
    • class – (Optional) Common class names are “navbar,” “header,” “main,” “sidebar,” and “footer.” If you change themes later, these names help Blogger determine how to transfer your content.
    • maxwidgets –- (Optional) The maximum number of widgets to allow in this section. If you don't specify a limit, there won't be one.
    • showaddelement – (Optional) Can be “yes” or “no,” with “yes” as the default. This determines whether the Page Elements tab will show the 'Add a Page Element' link in this section.
    • growth – (Optional) Can be 'horizontal' or 'vertical,' with 'vertical' as the default. This determines whether widgets within this section are arranged side-by-side or stacked.
    • Widgets

      A widget is represented by a single tag, which is a placeholder to indicate how the widget should be handled in the Page Elements tab.
      Some examples of widgets (one for a page header and one for a list) are:
      <b:widget id="header" type='HeaderView' locked="yes"/>
      <b:widget id="myList" type='ListView' locked="no" title="My Favorite Things"/>
      <b:widget id=”BlogArchive1” locked=”false” mobile=”yes” title=”Blog Archive” type=”BlogArchive”/>

    How to Use themes to change your blog looks

    People can see and interact with your blog in different ways by using one of Blogger’s themes.

    Choose a theme to use

    1. Sign in to Blogger.
    2. Choose a blog to update.
    3. In the left menu, click Theme.
    4. Click the theme you want to use.
    5. In the bottom right, click Apply to Blog.
    6. Optional: To save a copy of your theme, click Create backup. To skip backing your theme up, click Skip backup.

    Use a Dynamic Views theme

    When you’re using a Dynamic Views theme:
    • Blogger will record each post displayed as a pageview.
    • Your readers will have the option to change their default view.
    • Customize your theme


      1. Sign in to Blogger.
      2. Choose the blog to update.
      3. In the left menu, click Theme.
      4. Under “Live on blog," click Customize.
      5. Use the left menu to customize your background image or color and to adjust widths, layout, and other settings.
      6. In the top right corner, click Apply to Blog to make your changes live.

      Change font color and size
    • You can change the font, font color, and font size for your entire blog:
      1. Sign in to Blogger.
      2. Click the blog you want.
      3. In the left menu, click Theme.
      4. Click Customize.
      5. In the top left corner, click Advanced.
      6. Choose the font, font size, and font color you want for each kind of text you want to use. For instance, you can change the formatting for the regular blog post text or for the page headers.
      7. In the top right, click Apply to Blog

    How to change your blog’s design using HTML or CSS

    Use HTML to change your blog’s design
    1. Sign in to Blogger.
    2. Choose the blog to update.
    3. In the left menu, click Theme.
    4. Under “Live on Blog,” click Edit HTML.
    5. Make the changes you want.
    6. Click Save theme.
    Use CSS to change your blog’s design
    1. Sign in to Blogger.
    2. Choose the blog to update.
    3. In the left menu, click Theme.
    4. Under “Live on blog," click Customize.
    5. In the left menu, click Advancedand thenAdd CSS.
    6. Add your code.
    7. On the top right, click Apply to blog.

    How to change the design of your blog

    You can use gadgets to do things like display your blog's archive, show blog labels in a list on every page, or put your profile on every page.

    Add a gadget to your blog
    1. Sign in to Blogger.
    2. Choose the blog to update.
    3. In the left menu, click Layout.
    4. In the area where you want to add something, click Add a Gadget Add.
    5. In the window that opens, choose the gadget to add and click Add Add.
    6. In the lower left, click Save.
    Change the settings on a gadget

    In the lower right of the gadget, click Edit.

    How to show your profile on your blog

    1. Sign in to Blogger.
    2. In the top left, next to the name of your blog, click the Down arrow Down Arrow.
    3. Choose the blog to update.
    4. In the left menu, click Layout.
    5. Choose where on the page you want to show your profile and click Add a gadget.
    6. Choose a profile gadget:
      • The Google+ Badge gadget will display your Google+ profile.
      • The Profile gadget will show either your Blogger profile or Google+ profile, depending on which profile you’ve selected to contribute to blogs.
    7. Next to the one you want, click Add Add.
    8. Choose your settings.
    9. Click Save.
    10. In the top right, click Save arrangement.

    How to add a video to your blog

    1. Sign in to Blogger.
    2. Choose the blog to update.
    3. Create a new post or edit a post to add images.
    4. On the Post Editor, click Insert a video video icon.
    5. Choose the video you want to use.
    6. Click Upload.

    How to get blogger updates

    To get feature announcements, advice, and other info, sign up for email updates:
    1. Sign in to Blogger.
    2. In the left menu, click Settingsand thenUser settings.
    3. Under "Email Notifications," next to "Feature Announcements," choose "Yes."
    4. In the top right, click Save settings.

    How to change the name of your blog

    1. Sign in to Blogger.
    2. In the left menu, click Settingsand thenBasic.
    3. Next to "Title," click Edit.
    4. Enter a new name for the blog.
    5. Click Save changes.

    How to Start a Blog: Step-by-Step Instructions

    So you’re thinking about starting a blog, but you don’t have any idea where to start, right? Guess what—neither did we. We were clueless. When we created this blog a few years ago, we had no idea how to start a blog or how to be a blogger. Heck, we could hardly spell HTML, let alone build a blog.
    But good news: it’s easier than you think. We’ve learned a ton of lessons during our ascent to 4 million readers. And now you can learn from our pain and suffering to circumvent much of the tedium involved in setting up a blog.
    Here’s how we started our blog, step by step, followed by an instructional video, as well as additional rationale and insights:
    1. Domain and Hosting. The first thing we did when starting our blog was go to Bluehost and register our domain. We didn’t even need to set up a WordPress page first, which is the platform we use, since Bluehost does all that for you. Bluehost’s basic price is $2.95 a month, which works for 99% of people (go to this link to receive a 50% discount off the monthly price and a free domain). Then, we did a simple, free, “one-click” install of WordPress through Bluehost. When we had questions we were able to chat with the “live chat” folks at Bluehost for free. They pointed us in the right direction and made starting our own blog super easy.
    2. Theme. A good theme gives you the look and feel you want for your blog, allowing you to make a blog that looks exactly how you want it to look. If you’re not a coder (we certainly weren’t), then a theme makes the design work a million times easier. Plus, once you purchase a theme, which are inexpensive for the time they save you, you own it for life. A theme has two halves: the framework (the bones) and the Child Theme(the beauty):
      • Framework. There are several WordPress theme frameworks on the market, but Genesis is without a doubt the best and most flexible choice. Genesis is the first half of your theme. Many themes merely handle the aesthetics of your new blog, but Genesis provides a necessary foundation for your Child Theme. Simply go to StudioPress and purchase the Genesis Framework.
      • Child Theme. After you get your Genesis Framework, you’ll want to find the right Child Theme (which is just a silly way to say “blog design”). The Minimalists uses the beautiful “tru” theme, which is available at BYLT, the Genesis Community Marketplace. Head on over to BYLT, browse their carefully curated collection of themes, and find the design that’s right for you.
    3. Modify Your Blog. Once we had our domain, hosting, WordPress, and theme, we spent a lot of time tweaking the theme to get the look and feel we wanted (i.e., making our vision a reality). Then we spent even more time tinkering with the theme and arguing about it and tweaking it some more. Once we had created our blog, we set up a free Feedburner account so people could subscribe to our site via email and RSS subscriptions. And then we established a free Google Analytics account to track our stats. Feedburner and Google Analytics were both easy to sign up for, and we still use both today.
    4. Plugins. We use only a few plugins on our site: “Google Analytics for WordPress” and really simple Facebook and Twitter share-button plugins (since human beings are intrinsically wired to share value, it’s important to make your posts easy to share with others). They take just a few seconds (literally a few seconds, it’s just a click of a button) to install once you’ve started your blog. And if you really want to play around with some cool plugins, check out WPBeginner’s Best WordPress Plugins.
    5. Write Compelling Content. Last, via WordPress, we started writing and uploading the content for our pages: About Page, Contact Page, Start Here Page, Books Page, Tour Page, Archives Page, etc. Next, we designed our logo using free images we found online and text from a regular word-processing program. Then we put a picture of ourselves in the header (this is important because people identify with people, not logos). Finally we started writing new blog posts and publishing them regularly (at least once a week), accompanied by free photos from UnsplashPexels, and the Library of Congress. And the rest is history.

    How to Create a Blog: Video

    Watch our step-by-step instructional video, which includes screenshots of the entire starting-a-blog process:


    15 Reasons You Should Start a Blog

    We were inspired to research and write this essay after reading Joshua Becker’s 15 Reasons I Think You Should Blog, in which he discusses 15 great reasons why you should start a blog. Why being the key word here. In other words, he talks about the purpose of blogging, not just how to start a blog. That’s what all these other blogs about blogging seem to miss; they miss the purpose—the why behind starting a blog.

    3 Reasons You Should Not Start a Blog

    So now you have 15 reasons why you should start a blog, and we’ve shown you how to create a blog, step-by-step, based on our personal experience. But after giving you those detailed instructions, which could save you the hundreds of hours of wasted time, we also want to give you some good reasons why you should not start a blog. (Keep in mind that these reasons are just our opinions, and we do not pretend to offer them up as some sort of collection of empirical blogging maxims.)
    1. Money. You should not start a blog to make money. We need to get that out of the way first. If your primary objective is to replace your full-time income from blogging, forget about it. It doesn’t work that way. Do you think that Jimi Hendrix picked up his first guitar so he could “supplement his income”? No, he didn’t. Rather, he did it for the love of it, for the joy and fulfillment he received, and the income came thereafter, much later actually.
    2. Notoriety. Don’t plan on getting “Internet famous” right away. Not every site grows as fast as ours did, but that’s totally OK. The truth is that we kind of got lucky. We got a great domain name, we cobbled together a logo and site design that people really liked, we write fairly well, and our content connects with people in a unique way. We didn’t start this site to become “famous” though. That’d be ridiculous. Our notoriety and quick rise to “fame” came as a surprise to us, and was a result of a little luck and a lot of hard, passionate work.
    3. Traffic. Not all traffic is good traffic (as we explained here), so don’t worry about getting thousands of readers right away.
    The funny thing is that all these things can happen. You could make a full-time income from building a blog. We do it, Corbett Barr does it, and so do many others. And you could become Internet famous like Leo Babauta or Chris Brogan. But if these are the sole reasons why you start blogging, you’ll be miserable, because it will seem like a job, and if it feels like a job you won’t be passionate about it, and so you’ll either (a) hate it, (b) fall flat on your face, or (c) hate it and fall flat on your face.
    Instead, write because you’re passionate about it…
    Starting a Blog